
What is Facebook Pixel?
The Facebook Pixel plays a major role in the revenue of most businesses with an online presence. It is an essential analytics tool deployed via Facebook advertising to help businesses track their visitors’ website behavior. Moreover, it helps to optimize adverts across Facebook, Instagram, and the Facebook Audience Network.
It consists of several lines of HTML code from Facebook, which is copied into the backend of websites. By placing the Facebook Pixel code in the header of your website, Facebook collects details about what visitors do on your website. The purpose is to show your ads only to the right audience and make them more suitable for them. More data helps the Facebook Ads algorithm perform better and make the most out of your budget.
The Role and Function of the Pixel
So, the function of the pixel is to let you measure the effectiveness of your ads. After all, it is one of the most widely used advertising platforms for the promotion of your business. You need to compete with hundreds or thousands of similar brands on a daily basis.
It can be a handy tool to optimize ad delivery for your customized business objectives. However, to see the true potential of Facebook ads, you must know how to implement Facebook Pixel properly.
Hence, the article will divulge into details about the purpose behind its implementation, use cases, its advantages, and high-level steps to set the pixel.
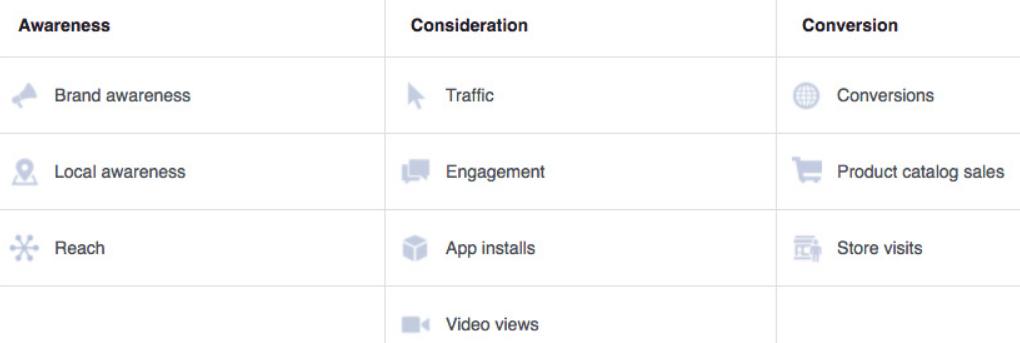
7 Ways the Facebook Pixel Helps You Build Effective Campaigns
The Facebook pixel helps you to gather useful details regarding actions and resulting conversion from Facebook traffic. So, here are the main reasons for and benefits of using the Facebook pixel—
-
Retarget Visitors –
It helps you to retarget visitors that have been on your website. By allocating your budget towards people who have already landed on your website, you can increase the conversion rate of your ads. These people are more familiar with your brand which increases the likelihood that they will convert. That’s why having a known, reputable brand is so powerful, and why companies invest millions in building their brand presence.
-
Track Conversions
You can essentially keep track of conversions coming as a result of Facebook advertisements. Knowing about user activities across various devices helps you design, or even redesign your ad to influence user behavior and website traffic. You can discover which ad sets and ads achieve what KPIs (e.g. you can discover which audience interest achieved more app installs or sales)
-
Optimize Advertising
After collecting comprehensive data about the viewers on your website, you can make informed decisions on ads. It helps you to increase your return on investment.
As you can see, Facebook Ad Pixel enables you to build effective campaigns. Hence, you need to install the Facebook Pixel on your website, before running Facebook Ads. So, with the help of the pixel, you can successfully optimize for conversions in tune with your business objectives.
4. Automation
Using Facebook Automated Rules, you can build automated campaigns. So, when your ads reach certain criteria, it triggers actions. It could be a case of increasing or decreasing budgets or even the pausing of ads not performing as well.
-
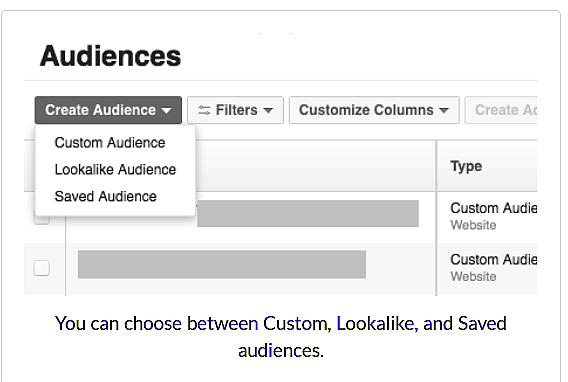
Create custom audiences
It enables you to create custom audiences. You can segment audiences based on their behavior on your website or while viewing your ads. For example, you can build an audience of website visitors or newsletter subscribers. You can also create an audience of people who visited specific pages. You can segment based on how long they watched your videos and engaged with your posts/ads.
-
Create lookalike audiences
Creating a lookalike audience is another benefit of the Facebook pixel. It helps in increasing your potential clients. They help to identify new audiences having similar characteristics to your current audiences. For example, they let you build audiences sharing similar demographics/interests to your highest-performing audiences.
These can be your website purchasers or newsletter subscribers. Your source audience must at least 100 users from a single country to build these audiences. We don’t recommend using lookalike audiences until you are able to achieve at least 200 sales within a 4 week period. The more sales, you get, the better your lookalike audience will perform.
7. Exclude Audiences
You can find audiences who have already initiated the required action (of having bought your product or services). After finding them, make sure to exclude them from retargeting. It will save you money and also stop you from annoying your customers. Imagine buying a product for £49.99 and seeing the same product available for £29.99, two days later.
You should avoid over-exposing your recent customers to your ads. We’d recommend not showing customers any ads for 28 days after they purchase. The only exception could be if you have a valid reason to do so (e.g. up-selling another product that’s slightly different – i.e. a sunglasses case for someone who’s purchased your sunglasses).
Step By Step Method – How to Create and Install the Facebook Pixel
You will require the following for creating a Facebook pixel—
- Your website—You will need a website which you or your developer can edit.
- Facebook Business Manager Account—You need this to manage Ads manager accounts, Facebook pages, Instagram accounts, WhatsApp accounts, Facebook pixels, apps, store catalogs, and even the people who work on them. You can manage everything here all in one place, and it’s free. To create yours, go here.
- Facebook Ads Manager Account—You need your Ads manager account – this is where you actually set up and run your ads. Most people create multiple if they have multiple clients, or products. Why? Because it adds a layer of safety, in case your ads manager gets banned by Facebook.
A. Create a Facebook Pixel—
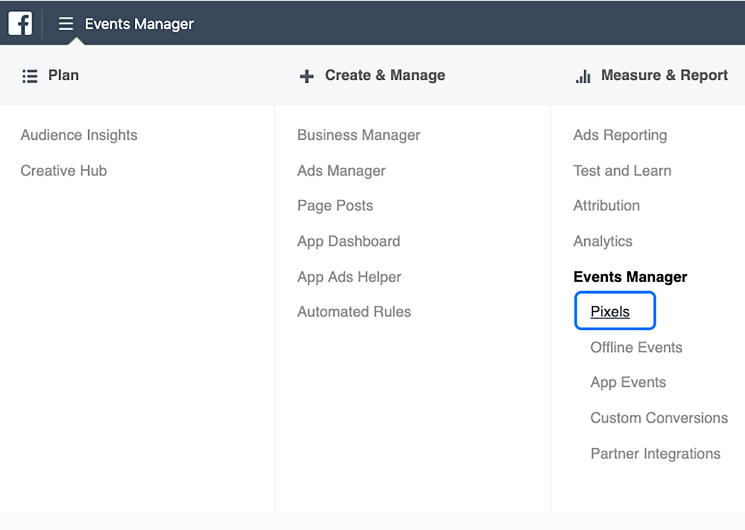
Step 1— Go to your Facebook Ads Manager, and locate your Facebook Events Manager.
![]() Source– https://www.facebook.com/business/learn/lessons/tips-to-create-and-install-facebook-pixel?ref=ahc_lwe
Source– https://www.facebook.com/business/learn/lessons/tips-to-create-and-install-facebook-pixel?ref=ahc_lwe
Step 2—Click + on “Connect data sources” and choose Web.
Step 3—Choose Facebook pixel and click on Connect.
![]()
Step 4— Choose a suitable name for your Facebook pixel keeping your business in mind.
![]()
Step 5—Enter the URL of your website to see easy options for setup.
Step 6—Click on Continue.
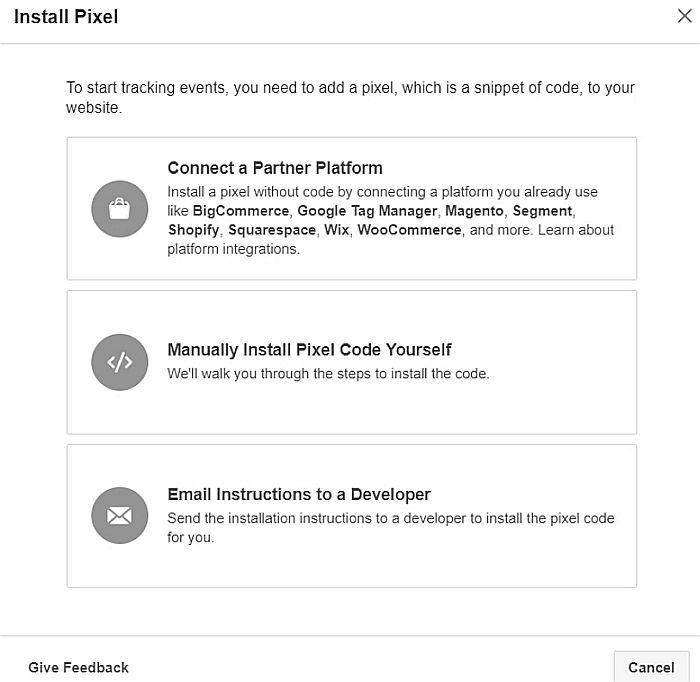
B. Install the Facebook Pixel Base Code
Your Facebook pixel is all set for installation. You will view a page having a set of instructions regarding the code which Facebook will provide. For this, you need to choose an option for installing your pixel code.
- Use a Tag Manager Plugin to install the pixel if you’re using a third-party website supporting this kind of integration. Otherwise, you can copy and paste the pixel code manually. You may also email the code to your developer having access to your website’s main code for placing it.
- If you selected the option to copy and paste the code, you’ll see the Install Pixel Base Code. So, click in the code box to copy the code to your clipboard. Just paste it in the header tags of your website under the SEO settings.
Set up Facebook Pixel Events—
After adding the pixel code to your site, you can measure the actions of the users (e.g. making a purchase) by setting up events. This can be done by the manual installation of the code or through the Event Setup Tool. But, please make sure that your pixel works efficiently.
Facebook has 9 events which can be selected on the basis of the actions to be tracked on your website—
- Purchase
- Lead
- Complete Registration
- Add payment info
- Initiate checkout
- Add to Cart
- Add to Wishlist
- Search
- View content
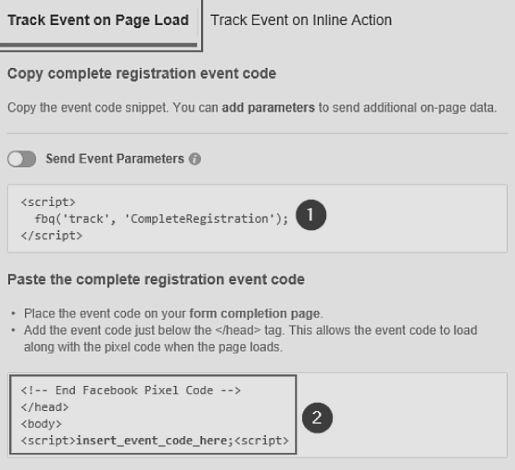
After you choose any of the above, you will be shown two choices—
- Track Event on Page Load—If the option you want can be tracked whenever a user lands on a specific page, then choose this option. Use this to keep a track of actions that comprise moving to a new page (e.g. sign-up success page or purchase complete).
- Track Event on Inline Action—You should select this option if you like your user to select something (e.g. selecting an item for shopping). Use it to keep a track of the actions within a specific page (e.g. clicking on ‘add to cart’ that doesn’t open any new page).
You can also add parameters to the event like currency or conversion value. It will help you to report your investment return.
For installing the events—
- Page load events: Write the code under the closing </head> tag. In some sites, it can be present after the <body> tag.
- Inline action events: Write the code between script tags succeeding the action you wish to track (e.g. a button).
You get the option of creating Facebook custom conversion events. But, additional action is needed for optimizing or tracking your campaign. Create any number of events for standard and custom and place these as per your requirements.
You don’t need a website for embedding your Facebook pixel into customized short URLs. This helps you to create your retargeting audiences with users who clicked your links.
Known as link retargeting, it lets you get to the users who did not visit your website. It helps you to build and increase your retargeting audience fast and in a cost-effective manner. You get the opportunity to turn these audiences into potential customers.
Tracking your Campaign Results—
Finally, you have successfully completed the installation process of your pixel and events.
Use Conversion Tracking for Measuring Results–
- Move to your Ads Manager.
- Select Campaigns, Ad Sets, or Ads (based on what you need to track).
- Now, opt for the Columns dropdown menu.
- Choose Customize Columns. Select the boxes located next to the actions that are relevant to your business.
- Click on Apply. You shall find these columns in a table.
 To know the results of your pixel, move from your Ad Manager menu to Facebook Analytics. On the pixels menu, choose your pixel. You can see the details which your pixel is gathering. Meanwhile, you must give a couple of hours for the pixel to collect the information. You will see clearly that what was taking place on your site before the installation of the pixel is not present anymore.
After the successful set up of your pixel, you can use it for advertising. Here, you will see a menu showing several view options on the left. You can use Analytics to find and keep a tab on users, make conversion funnels, dashboards, and many other things.
So, whenever you make ads or boost any posts, click on the Facebook pixel (below ‘Tracking Conversions’) to activate it. It helps you to track and analyze the results of your campaign.
You can use a single pixel across the entire website. It can be used for different pages of your website. Meanwhile, you may have to make use of two pixels on a single website. Yes, if you have engaged two agencies for running ads for your brand, then each of them shall have to install separate pixels for your website.
Facebook Pixel Helper –What is it and how to install and use the Facebook Pixel Helper Google Chrome Extension?—
Are you are facing any problem with your Facebook Pixel or simply want to get the best results? Then, the answer is ‘Facebook Pixel Helper’.
-
What is it?—
It is an extension on the Google Chrome browser to make sure the Pixel has been installed and working correctly. You can see the total number of Pixels on every webpage, along with any mistakes, or warnings. If you are a Facebook marketer, use this excellent tool today.
-
How to install and use it?
You can install Facebook Pixel Helper easily. First of all, you have to install Google Chrome plugin. Then, you need to choose it as your default browse to see the status of your Pixel (like events your pixel is getting) while browsing every day.
Vital Tips to increase the functioning of your pixel–
The Facebook Pixel Helper can provide you vital tips to increase your pixel’s functioning.
These include—
-
Log actions happening on your website-
-Put your Facebook pixel base code in your website’s header. It records the actions you are interested in. However, if it is set down on your web page, then it might not get some actions of your customers. Why? Well, the reason is that such actions of the customers make take place before the pixel fires.
-
Opt-in to tracking from Facebook
— If you opt-out of tracking (from Facebook), then Facebook may not see any issues with your pixel. So, move to your Facebook settings to opt-in. If needed, update the settings of your device.
-
Put one conversion event for every page to track events and improve optimization
— You should not place more than one conversion event for each page. The only exception could be when additional conversion events on any page shoot whenever a customer undertakes a specific action (clicking on any button, etc.).
After the successful set up of Facebook Pixel Helper, you will see a small icon next to the address bar. Move to your website in your Google Chrome browser. Now, click on the ‘Pixel Helper’. You will see a pop-up showing which events and pixels were located on the page, and if they have been successfully loaded.
Conclusion—
The Facebook pixel is a must-use and dynamic tool for your internet marketing campaigns. Stay on track and grow your business by improving your Facebook ads. You can also develop a strategy to fulfill your business goals. To conclude, monitor the ROI of your campaigns accurately and use website visitor retargeting by using the Facebook pixel.

